Presenting Graphs & Images on watsonx Orchestrate
How to get IBM watsonx Orchestrate to show images and graphs
By Piers Walter, Niamh Morrissey, William Bittles, Konrad Gurbiel

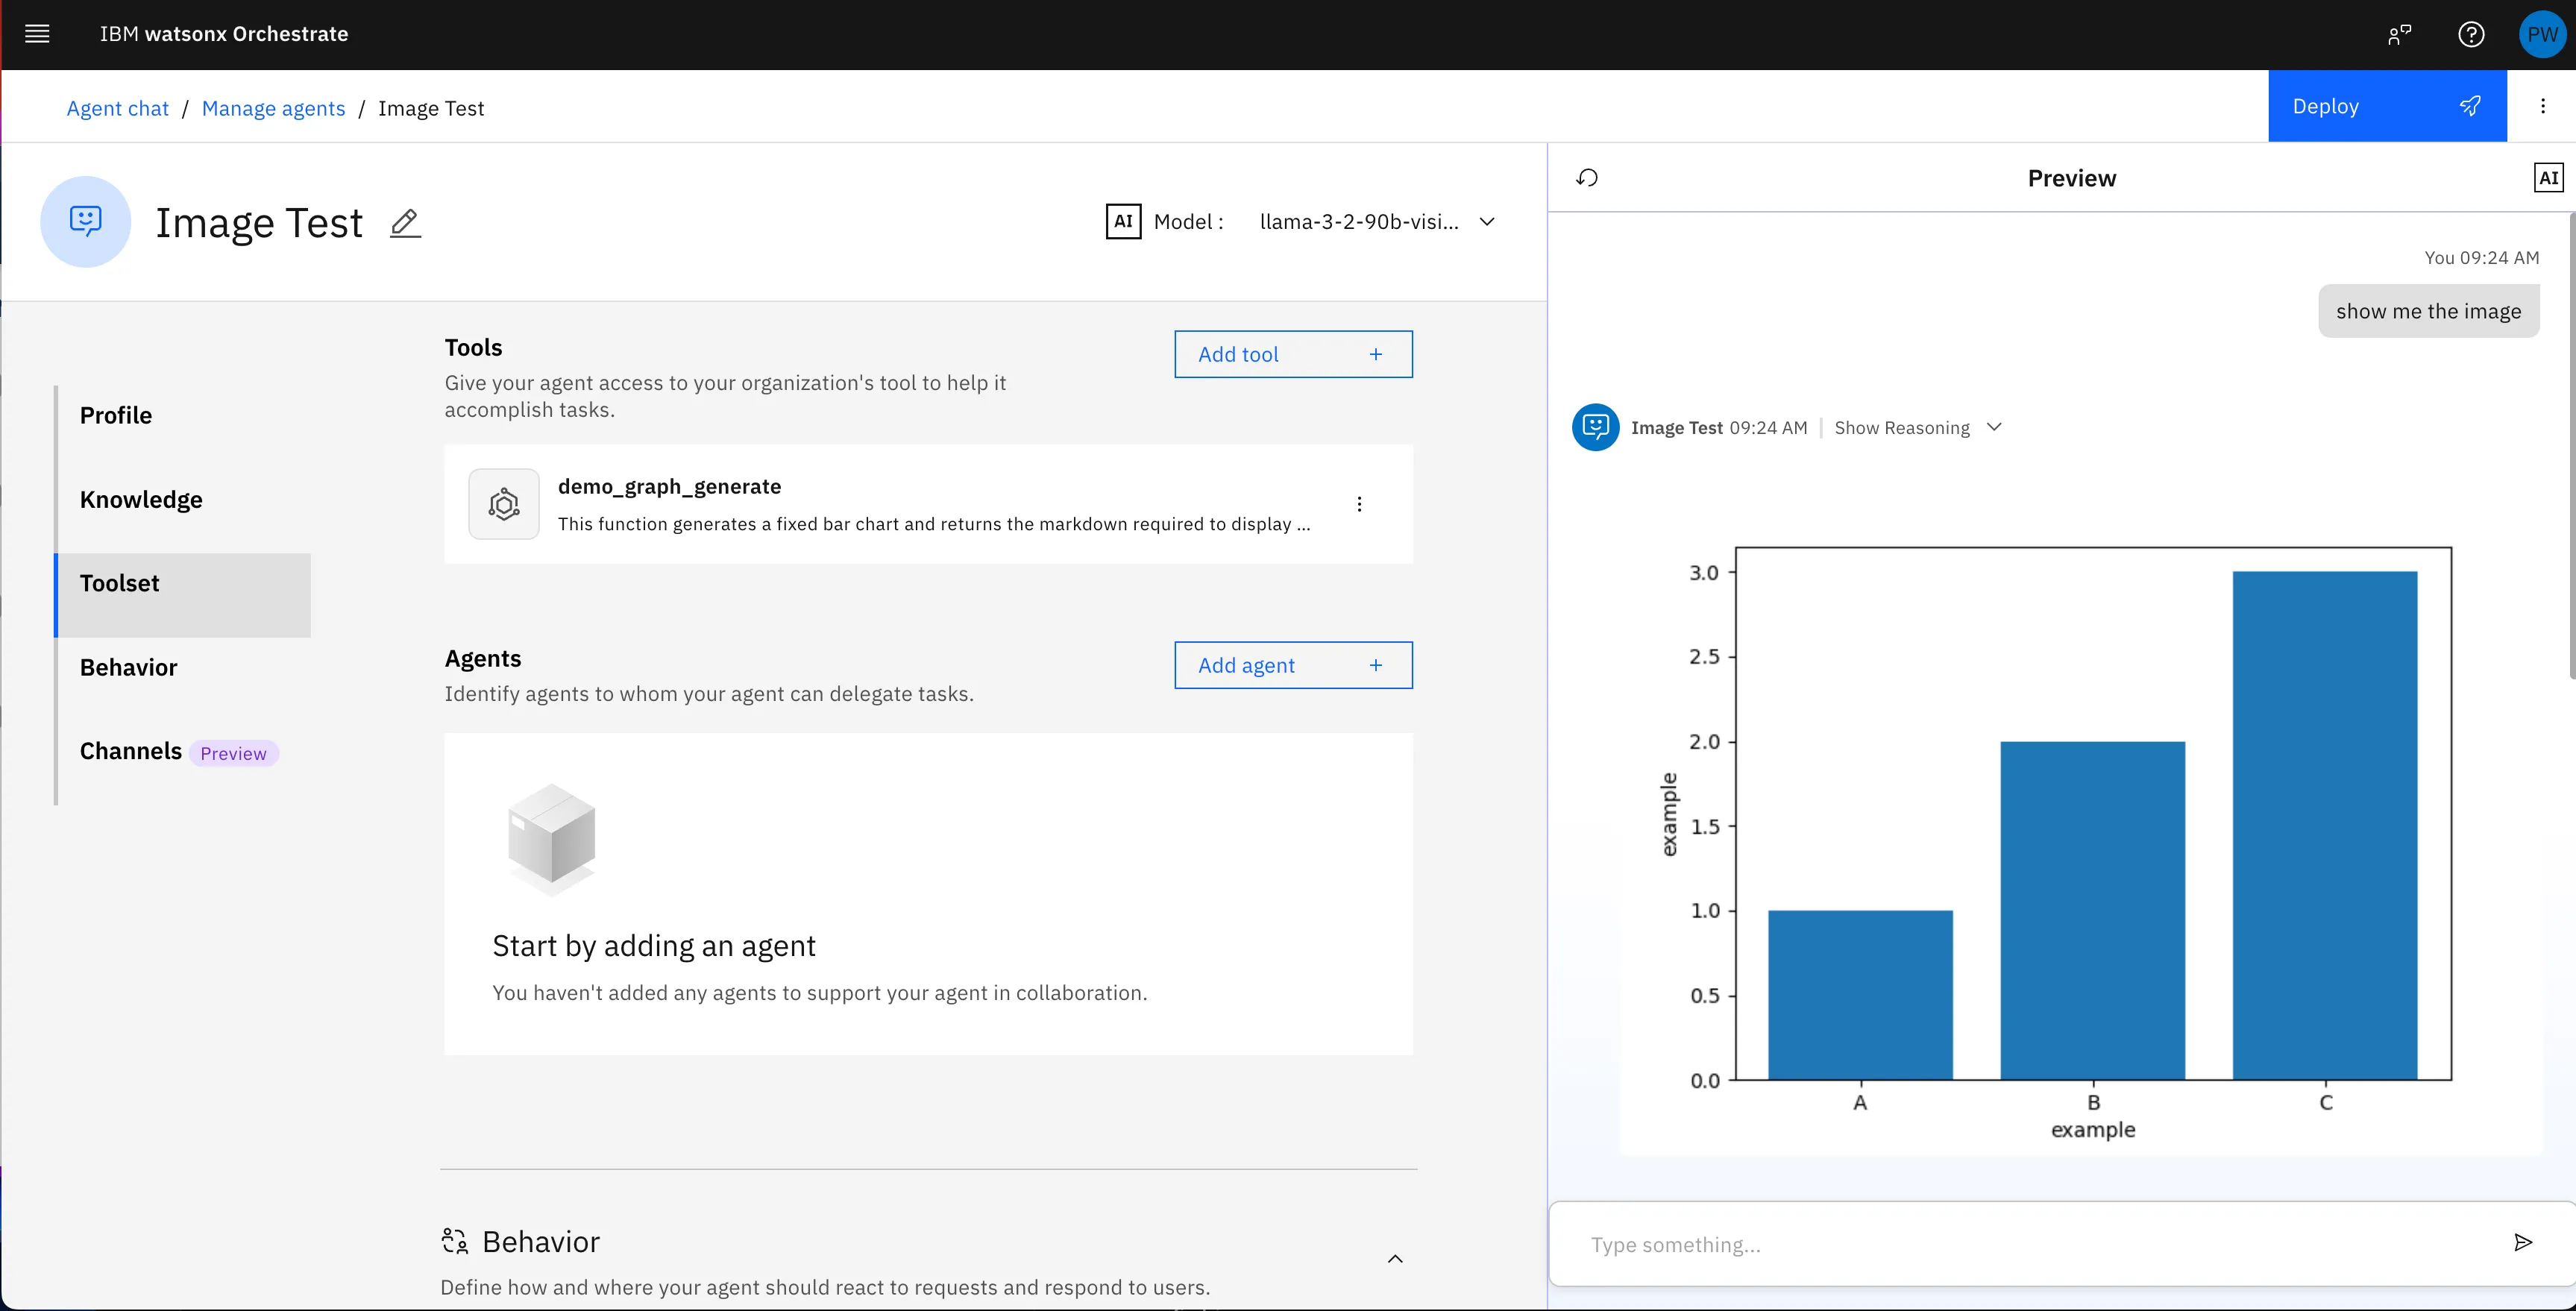
Recently we were working on a project involving IBM watsonx Orchestrate where we wanted to present graph data to the end user, however at the moment watsonx Orchestrate it a primarily a text-based platform. Below we detail how we managed to get Orchestrate to present images.
Orchestrate & Rendering
IBM watsonx Orchestrate is a chat based platform for building agentic systems. At the moment the way it can output is limited to text, however the frontend automatically renders markdown including headings, table and code blocks. We experimented a bit and thought maybe it would render markdown’s  syntax for images. We created a blank agent, asked it Write the markdown to render this image: https://blog.pierswalter.co.uk/_astro/enable_actions.ChEKQbfC_Z1kNiTa.webp and there it was, our image. This meant if we could find a way to generate graphs with code and store them in a publicly facing location we’d have a way to show graphs to the user
Matplotlib
We decided to make use of Python’s matplotlib library, which allows you to render graphs from code and export them as an image file. For this demo we hardcoded a simple bar graph with three columns to prove the point, however the input could come from an LLM or another data source going forwards. The full code is available below, with matplotlib being used in the bar_graph() function.
Security, COS & Presigned URLs
With the images generated by matplotlib, we then needed a way to securely show these to the user. A good way to do this is to make use of presigned URLs. These are a feature of AWS S3 and S3-compatible storage buckets such as IBM’s Cloud Object Storage (COS). These allow for time-limited access to either download a resource or upload. For this use case we chose download and we generate a URL which is valid for 10 minutes, this allows the user to view the image in the chat but means only they can see it, even if a rogue actor knows the object and bucket name, they won’t be able to access it.
A presigned URL from IBM COS will look something like this:
https://s3.us-south.cloud-object-storage.appdomain.cloud/image-bucket/image_123456.png?X-Amz-Algorithm=AWS4-HMAC-SHA256&X-Amz-Credential=AKIAIOSFODNN7EXAMPLE%2F20250717%2Fus-east-1%2Fs3%2Faws4_request&X-Amz-Date=20250717T082501Z&X-Amz-Expires=600&X-Amz-SignedHeaders=host&X-Amz-Signature=ee74c3368e88349eb0cb6fa14f7c319e3ca319facd84bd52230204f7fefaa273The URL contains many different parameters which are explained well in AWS’s S3 Documentation
Orchestrate, Tools & Censoring
In the Python code below, you’ll notice there are a lot of values which are hardcoded which would be better suited to be stored in watsonx Orchestrate’s connection details which the tool can access and is designed for things such as API keys. The reason they are set in the code is that Orchestrate will look out for any strings in the credentials and censor them on output. So if we set the bucket endpoint, bucket name and access key as credentials the generated URL as returned to the user would look like
***REDACTED***/***REDACTED***/AKIAIOSFODNN7EXAMPLE?X-Amz-Algorithm=AWS4-HMAC-SHA256&X-Amz-Credential=***REDACTED***%2F20250708%2Fus-east-1%2Fs3%2Faws4_request&X-Amz-Date=20250708T162638Z&X-Amz-Expires=600&X-Amz-SignedHeaders=host&X-Amz-Signature=ee74c3368e88349eb0cb6fa14f7c319e3ca319facd84bd52230204f7fefaa273which can’t be used to access the image. For now a workaround is to include all non-sensitive parameters in the source code itself, the only issue with this is it means there’s no way to have different values for the draft and live environments.
Connecting the Tool to COS
As the tool needs to use HMAC credentials to connect to the bucket, it’s very important to keep the secret access key secret. In orchestrate this is managed through the use of connections, which the Python tool can then programmatically access through the following python snippet
cos_creds = connections.key_value("cos_bucket_connection")COS_SECRET_ACCESS_KEY = cos_creds["COS_SECRET_ACCESS_KEY"]This requires us to have a connection setup called cos_bucket_connection which is a key-value style connection which contains a key of COS_SECRET_ACCESS_KEY. This can be done using the orchestrate CLI or in the UI. To do this with the cli you can use the following command
$ orchestrate connections set-credentials --app-id cos_bucket_connection --env draft -e "COS_SECRET_ACCESS_KEY=SECRET_GOES_HERE"Read more about Orchestrate connections and configuration here in the developer docs
Example Code
Below is the python code for the tool we used to generate an example image and return the markdown for the agent to present to the user. This can be imported as a tool into watsonx Orchestrate by following the latest instructions on the watsonx Orchestrate Developer Docs site.
demo_graph_tool.py
import ioimport randomimport string
import ibm_boto3from ibm_botocore.client import Config, ClientError
import matplotlib.pyplot as pltimport numpy as np
from ibm_watsonx_orchestrate.agent_builder.connections import ConnectionType, ExpectedCredentialsfrom ibm_watsonx_orchestrate.agent_builder.tools import tool, ToolPermissionfrom ibm_watsonx_orchestrate.run import connections
BUCKET_CONFIG = { "bucket_endpoint": "https://s3.us-south.cloud-object-storage.appdomain.cloud", "bucket_name": "image-bucket", "bucket_access_key": "AKIAIOSFODNN7EXAMPLE",}
@tool( permission=ToolPermission.READ_ONLY, expected_credentials=[ExpectedCredentials( app_id="cos_bucket_connection", type=ConnectionType.KEY_VALUE )])def demo_graph_generate() -> str: """ This function generates a fixed bar chart and returns the markdown required to display it as a string. """
parsedData = { "graph": 'bar', "x": { "label": 'example', "data": ["A", "B", "C"]}, "y": { "label": 'example', "data": [1, 2, 3]}}
return f"}"
def get_random_name(size=20) -> str: prefix = ''.join(random.SystemRandom().choice(string.ascii_uppercase + string.digits) for _ in range(size)) return f"{prefix}.png"
def bar_graph(data: dict) -> str: """Generate a bar graph image and return a signed URL to the file """ x = np.array(data['x']['data']) y = np.array(data['y']['data'])
plt.bar(x, y) plt.xlabel(data['x']['label']) plt.ylabel(data['y']['label']) image_stream = io.BytesIO() plt.savefig(image_stream, format="png") image_stream.seek(0) image_png = image_stream.read() filename = get_random_name() signedUrl = cos_save_image(filename, image_png) return signedUrl
def cos_save_image(file_name, file_content): """ Upload a file to IBM Cloud Object Storage and return a signed URL to the file """ COS_ENDPOINT = BUCKET_CONFIG["bucket_endpoint"] COS_BUCKET_NAME = BUCKET_CONFIG["bucket_name"] COS_ACCESS_KEY = BUCKET_CONFIG["bucket_access_key"] cos_creds = connections.key_value("cos_bucket_connection") COS_SECRET_ACCESS_KEY = cos_creds["COS_SECRET_ACCESS_KEY"]
http_method = 'get_object' # Valid for only 600 seconds (10 minutes) expiration = 600
cos_client = ibm_boto3.client("s3", aws_access_key_id=COS_ACCESS_KEY, aws_secret_access_key=COS_SECRET_ACCESS_KEY, config=Config(signature_version="s3v4"), endpoint_url=COS_ENDPOINT )
print("Creating new item: {0}".format(file_name)) try: cos_client.put_object( Bucket=COS_BUCKET_NAME, Key=file_name, Body=file_content, ) print("Item: {0} created!".format(file_name)) except ClientError as be: print("CLIENT ERROR: {0}\n".format(be)) except Exception as e: print("Unable to create text file: {0}".format(e))
signedUrl = cos_client.generate_presigned_url( http_method, Params={'Bucket': BUCKET_CONFIG['bucket_name'], 'Key': f"{file_name}"}, ExpiresIn=expiration ) print(signedUrl) return signedUrlrequirements.txt
numpy==1.26.4matplotlib==3.10.3matplotlib-inline==0.1.6ibm-cos-sdk==2.14.2ibm-cos-sdk-core==2.14.2ibm-cos-sdk-s3transfer==2.14.2